Wednesday, January 27, 2010

Silverlight 3: Auto select text in TextBox

Missing out of the box in Silverlight 3 is the ability to auto select the text in a textbox when it receives focus. Thankfully Attached Properties make it very easy to add the functionality. In this post I will create a AutoSelectText attached property, which when set to true will select all the text as when the textbox receives focus. And because of routed events, it is not required to add the property to every textbox on a page. Instead it can be added to the parent content control and all child textboxes will have to auto select behavior.

Usage

  1. <Grid x:Name="LayoutRoot"
  2.     attachedProperties:AttachedProperties.AutoSelectText="true">
  3.     <StackPanel Orientation="Vertical"
  4.                 HorizontalAlignment="Left">
  5.                  <TextBox Text="Will not auto select"
  6.                  MaxWidth="300"
  7.                  Margin="4"
  8.                  attachedProperties:AttachedProperties.PreventAutoSelectText="true" />
  9.         <TextBox Text="Will auto select 1"
  10.                  MaxWidth="300"
  11.                  Margin="4"/>
  12.         <TextBox Text="Will auto select 2"
  13.                  MaxWidth="300"
  14.                  Margin="4" />
  15.     </StackPanel>
  16. </Grid>

Line 2: The AutoSelectText is set to true on the root level content control (Grid). That’s it. All text boxes within the Grid will participate in the auto select text functionality.
Line 8: A control can opt out by setting the PreventAutoSelectText property to false.

Listed below are some of the key code blocks. The link to the entire source code can be found at the end of the post.

Declaring the attached property

  1. public static readonly DependencyProperty AutoSelectTextProperty = DependencyProperty.RegisterAttached("AutoSelectText",
  2.                                                                        typeof(Boolean),
  3.                                                                        typeof(AttachedProperties),
  4.                                                                        new PropertyMetadata(OnAutoSelectTextChanged));
  5.  
  6. public static readonly DependencyProperty PreventAutoSelectTextProperty = DependencyProperty.RegisterAttached("PreventAutoSelectText",
  7.                                                                               typeof(Boolean),
  8.                                                                               typeof(AttachedProperties),
  9.                                                                               null);

Line 1-2: A new boolean attached property called AutoSelectText is declared.
Line 4: The OnAutoSelectTextChanged event handler is registered, which is be invoked when the value of the property is set in the xaml.
Line 6: A new boolean attached property called PreventAutoSelectText is declared. Controls can use this property to opt out of the auto select functionality.

The dependency property changed event handler

  1. private static void OnAutoSelectTextChanged(DependencyObject d, DependencyPropertyChangedEventArgs e)
  2. {
  3.     //This works because of event bubbling.
  4.     FrameworkElement frameworkElement = d as FrameworkElement;
  5.     if (frameworkElement != null)
  6.     {
  7.         if ((bool)e.NewValue)
  8.             frameworkElement.GotFocus += OnGotFocus;
  9.         else
  10.             frameworkElement.GotFocus -= OnGotFocus;
  11.     }
  12. }

Line 8: If the value of the AutoSelectText (accessed using e.NewValue) is true, we add the OnGotFocus event handler to the GotFocus event of the control on which the AutoSelectText property is being set (from the xaml).
Line 9: Similarly if the control does not wish to participate in auto selecting of text, we remove our event handler.

The GotFocus event handler

  1. private static void OnGotFocus(object sender, RoutedEventArgs e)
  2. {
  3.     TextBox textBox = FocusManager.GetFocusedElement() as TextBox;
  4.     if (textBox != null && !(bool)textBox.GetValue(PreventAutoSelectTextProperty))
  5.         textBox.Select(0, textBox.Text.Length);
  6. }

Line 3: Since we are using routed events, the sender parameter will not be the textbox that currently has focus. It will the root level content control (Grid) which has the AutoSelectText attached property. The FocusManager class is used to get a reference to that control that has the focus.

Why two attached properties?

Silverlight does not provide a way to check if a control has a attached property defined in the xaml. Due to this if I replace

  1. if (textBox != null && !(bool)textBox.GetValue(PreventAutoSelectTextProperty))

in the OnGotFocus method with

  1. if (textBox != null && !(bool)textBox.GetValue(AutoSelectTextProperty))

I will always get false for the textBox.GetValue call, even if the AutoSelectText has not been defined for the textbox in xaml.

Download source code for AutoSelectText attached property.

Friday, October 16, 2009

RIA Services Change Set Conflict Resolution using ResolveChangeSet

If there are optimistic concurrency errors when a change set is submitted to a RIA Services DomainService, the error information is reported to the client in the resulting SubmitOperation via the Entity.Conflict member. Server side conflict resolution can be added by adding entity specific resolve methods in the DomainService. For example to handle optimistic concurrency errors for the Product entity you can add a ResolveProduct method in the DomainService.

   1: public bool ResolveProduct(Product currentProduct, Product originalProduct,
   2:     Product storeProduct, bool deleteOperation)
   3: {
   4:     return base.Resolve(currentProduct, originalProduct, storeProduct,
   5:                         ResolveOption.KeepChanges);
   6: }

The code snippet listed above is from the Microsoft .NET RIA Service Overview (July 2009 Preview) document.

Global Conflict Resolution


With this method, a separate resolve method is required for each entity, which is not scalable if there happen to be a large number of entities the domain. In such a case we need another way of handling conflict resolution. Global conflict resolution can be implemented by overriding the ResolveChangeSet method of the DomainService. If you are unaware of ResolveChangeSet method, check the Server Side Change Set Processing section listed after this one.

The ResolveChangeSet method is called for every conflict, regardless of entity type and can be overriden to provide global conflict resolution. Listed below is a code snippet that can be used for last one wins type resolution.


   1: protected override bool ResolveChangeSet(ChangeSet changeSet)
   2: {
   3:     bool resolveChangeSetSuccess = true;
   4:     bool resolveSuccess = false;
   5:  
   6:     foreach (EntityOperation entityOperation in changeSet.EntityOperations)
   7:     {
   8:         resolveSuccess = base.Resolve(entityOperation.Entity, entityOperation.OriginalEntity, 
   9:             entityOperation.StoreEntity, ResolveOption.KeepCurrentValues);
  10:         
  11:         if (resolveSuccess)
  12:             entityOperation.ConflictMembers = null;
  13:  
  14:         resolveChangeSetSuccess = resolveChangeSetSuccess && resolveSuccess;
  15:     }
  16:     if (resolveChangeSetSuccess)
  17:         this.Context.SubmitChanges();
  18:  
  19:     return resolveChangeSetSuccess;
  20: }


Line 8-9: For each entity in the change set, we resolve the conflict by specifying the ResolveOption.KeepCurrentValues (last one wins).
Line 12: One would think that if the method returns true, the error will not be reported to the client. However that is not the case. The ConflictMembers has to be set to null to prevent the conflict error from being reported to the client.

Line 17: If all the entities could be successfully resolved, the change set is saved.

Server Side Change Set Processing


When a change set is submitted to the DomainService, a predefined sequence of methods are called to authorize, validate and persist the change set. This sequence is listed below:

  1. Submit – the service entry point that receives the change set and begins the change set processing pipeline.

  2. AuthorizeChangeSet – Verifies Permission/Authorization for each operation. If any operations are not permitted, processing stops and an error is returned to the client.
  3. ValidateChangeSet – Validation for all operations in the change set is run. If any operations fail validation, processing stops and errors are returned to the client.
  4. ExecuteChangeSet – The corresponding method for each operation in the change set is invoked. This is the point in time when your business logic is run. If any operations failed, processing stops and errors are returned to the client.
  5. PersistChangeSet – At this point all the domain operations have been executed, and this method is called to finalize the changes.
  6. ResolveChangeSet – If there were any optimistic concurrency errors, this method is called to resolve them.

Thursday, September 24, 2009

XAML binding CodeRush templates

When I first started coding in Silverlight, I could never remember the syntax for databinding in XAML. Everytime I had to do databinding I found myself referring to the documentation. The lack of intellisense or compile time syntax checking was no fun either. So after a few days I created a few CodeRush templates, which I still use to speed up development. You can download them at the end of this post. The templates are:

bp (Bind to Property):

bsr (Bind to Static Resource):

bc (Bind using Converter):


be (Bind to Element):

Download XAML binding CodeRush templates

Tuesday, September 16, 2008

Couple of XAML Editor enchancements in Visual Studio 2008 SP1

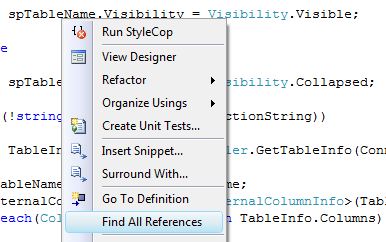
The "Go To Definition" functionality in the XMAL code behind editor has been enhanced in Visual Studio 2008. Invoking it on a reference of a control in the XAML code behind page, now takes the user to the definition of the control in XMAL code. What a pleasant change from the prior behavior where invoking the command would take the user to the designer generated code behind page.

So when you do this:

image 

You get this:

 image

instead of (in the .g.cs file)

image 

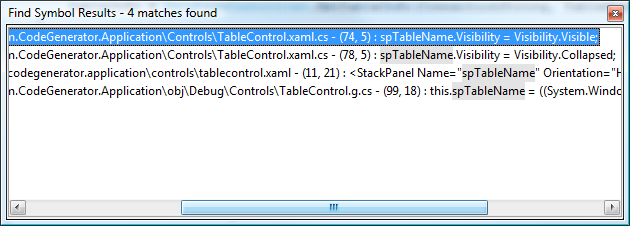
The “Find all References” functionality has also been enchanced with the service pack. Invoking it on a reference of a control in the XAML code behind page, now inclues the references made in the XAML code also.

So when you do this:

image

You get this (Note the third reference in the tablecontrol.xaml file):

image

Wednesday, August 13, 2008

Programmatically creating DotNetNuke user passwords

When programmatically creating a DotNetNuke portal, the CreatePortal method API expects passwords that are already encrypted. In DotNetNuke, by default the passwords are encrypted using one way Triple DES algorithm. There is existing functionality in DotNetNuke that can be reused to encrypt plain text passwords. Listed below is some sample code that can be used.

Requirements: The code listed below uses the following classes that can be found in the assembly: DotNetNuke.dll

  • DotNetNuke.Security.PortalSecurity
  • DotNetNuke.Common.Globals
  • DotNetNuke.Entities.Users.UserController

   1: string userName = "sampleUserName";
   2:  
   3: //generate a random 8 character password
   4: string password = UserController.GeneratePassword(8)
   5:  
   6: //get the machine's encryption key
   7: string key = Convert.ToString(Globals.HostSettings["EncryptionKey"]);
   8:  
   9: //encrypt the password with the machines encryption key
  10: PortalSecurity portalSecurity = new PortalSecurity();
  11: password = portalSecurity.Encrypt(key, password);

Line 4: We generate a random 8 character password using the static GeneratePassword in the UserController class. It is not required to use the method, you can substitute it with you own logic. Keep in mind to satisfy the password requirements configured in DotNetNuke.
Line 7: When users login, DotNetNuke encrypts the plain text password using the encryption key that is stored in the web.config. It then compares it to the encrypted version that is stored in the database, and if they match the login successed. We have to use the same encryption key or else the user will not be able to login even if he uses the right password. We use the Globals class which contains a collection of utility functions, to retrieve the encryption key.
Line 11: We use the Encrypt method of the PortalSecurity class to encrypt the password.

Thursday, July 31, 2008

Programmatically checking if the required alias is available in DotNetNuke

If you try to create a portal with a alias that in not available, DotNetNuke will complain about it and not allow you to continue ahead. It turns out that this duplication check is done by the UI and not the business layer. So if you are programmatically creating a portal, you will have check if the required alias is available, because the DotNetNuke API does not do it.

Requirements:
All the classes used below can be found in the assembly: DotNetNuke.dll in the DotNetNuke.Entities.Portals namespace

Listed below is some sample code you can use the following code you programmatically check if the required alias is available in DotNetNuke.

   1: public static bool IsAliasAvailable(string alias)
   2: {
   3:     //need to make sure that the alias does not contain http://
   4:     alias = alias.Replace(@"http://", "");
   5:  
   6:     PortalAliasController aliasContoller = new PortalAliasController();
   7:     PortalAliasCollection aliasCollection = aliasContoller.GetPortalAliases();
   8:     return  !(aliasCollection.Contains(alias));
   9: }


Line 4: Since DotNetNuke does not store the "http://" part of the alias in its database, remove it from the string holding the alias before checking.
Line 7: Use the GetProtalAliases method in PortalAliasController class to get a PortalAliasCollection.
Line 8: Since PortalAliasCollection inherits from System.Collections.DictionaryBase, you can use the Contains method to check if the alias is available.

Tuesday, July 1, 2008

Programmatically creating DotNetNuke portals - Part 1

If the need ever arises you can use C# to use the DotNetNuke API to programmatically create portals you can use the code listed below. Of course the code will need all the right permissions to do this. You will need the following information to create the portal.

  1. Portal Name
  2. Administrator first name and last name
  3. Administrator username and password
  4. Administrator email
  5. Portal description
  6. Portal Keywords
  7. Name (including path) of the template to the applied to the portal
  8. Portal Alias
  9. Server path (the path to the root of the Application)
  10. If it is a child portal the child path (the path to the child portal folder)

Listed below are the required steps to create the portal and perform some essential house keeping activities:

  1. Make sure that the alias does not contain the string "http://".
  2. Check if the required alias is available.
  3. Encrypt the administrator password with the machine encryption key.
  4. Get all the required paths: template path, home directory and server path.
  5. Create the portal.
  6. Add the new http alias (url) to the Http handler.
  7. Log the portal creation event tp DotNetNuke's event log.

In the next few days, I'll add a detailed post for each of the steps listed above.

Update 1: I've just posted an article on Programmatically checking if the required alias is available in DotNetNuke

Update 2: I've just posted an article on Programmatically creating DotNetNuke user passwords

Subscribe to my feed in your favorite feed reader